


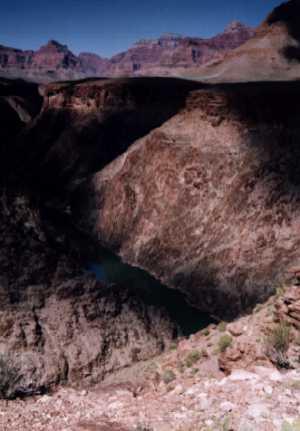
First you get into the bed of Slate Canyon. You can start where the Tonto Trail meets Slate, scrambling down ledges in the bed. Or, if you're coming over from Boucher, you can save yourself some backtracking by entering Slate Canyon at a ravine just to the east of a finger (that's what it looks like on the map) of Tapeats Sandstone that's about an eighth of a mile east of the junction of the Tonto Trail with Slate Canyon. This finger is right along the 3200-foot contour line on the map. You scramble down the ravine (the route's unmarked) on the east side of the finger.
Once you're in the bed, you come to a place where the bed meanders west. The first fall is about midway along this meander--that is, at its west-most extreme--and the second fall is near its return (east end). Avoid entering the meander. Above you on the east side of the bed is a column of Tapeats, standing free of the Tapeats rim on the east. You clamber up over the saddle between the column and the east rim, and scramble steeply down the north side, ending back in the bed below the falls. From there on there's only occasional scrambling in the bed, all the way to the river.
This description of the route to Crystal Rapids is quoted from Jim Ohlman, a Grand Canyon trail guide, and is pretty much a typically accurate and complete trail description--in fact, it is one of the better ones you will read ... except that it is in code, and learning new code is not what we mature (middle-aged) individuals do very well.
To follow this verbal guide, you need your map and compass, plus an idea that a "bed," a "meander," and a "saddle" aren't especially stressful technical terms. You obviously have to know your Tapeats, though, and how to find the 3200-foot contour interval on the map--plus how to translate the map's abstract shape into the compass directions and land formations you need to find ... and the ones you are looking at where you stand. If (like us) you can barely even see the so-called "finger" on the map with your failing eyes, it's hard to scale that ink-wiggle up to the reality of a grueling, hour-long scramble (read: slip, slide, stumble, bump & grind) through loose boulders and rattlesnake dens (see I'm Not Entirely Sure It's That Nice for the subjective version). And, since things always change in the Canyon, by the time we reached the "finger", the route to Crystal--indeed a slightly different route--had been marked, making us not a little unsure if that was the direction we wanted.
The key, alas, is experience and patience. All four of us are not patient. We are bad students because we normally learn with ease; but in this case (in most cases) Nature will not be rushed--a bit akin to Rumpole's "she who is not amused".
You, like us, will run into this demand for old-dog-new-trick learning many times. Sharon Spangler in On Foot in the Grand Canyon is convinced that measurements are useless, and that your only proper guide is knowing how the geology changes as you descend. She says, "Progress along the trail is marked by one's passage through the rock formations. Elevations, mileages, hours-to-hike, and other conventions of hiking guidebooks do not apply well in describing hiking in the Grand Canyon or in giving the hiker an idea of what to expect [italics original]." Ironically, however, it is she who prints the Crystal Rapids quote from Jim Ohlman, one of her hiking companions.
The best way to gain experience is to write your own trail descriptions, using your journal. It will help you learn the rock formations and geology, remind you of surprises you may encounter on future treks (something we should have done before we were trumped by the fool's corner again on the Grandview Trail), enhance your powers of observation, lead you back to your maps for reference and "translation", and give you first-hand comparisons with published trail descriptions--so you can see how the Canyon's changed. (It gave us the proverbial willies to see that a wide, shallow cave in which we had planned to sleep two years earlier had collapsed.)
Trail descriptions might seem like elementary business to many of you, but less than a decade ago I was entirely topo-illiterate--and I didn't even know where to find a map. I started a little low-impact hiking locally, and discovered U.S. Geological Survey maps in a bookstore not far away; you can also get them directly from the government by contacting the National Cartographic Information Center, 507 National Center, Reston, Virginia 22092.
 Lost in the vastness
The map symbols are fairly straightforward, with brown contour lines that show hills and valleys, white areas for clearings, blue for water, and green for forests. Blacks shapes are human structures, trails, and the like; a legend identifies the special items such as falls, campsites, springs, ruins, tunnels, and so on. Obtain and study a map for your "quadrangle" and begin wandering anywhere nearby that has distinct geographical features; compare them with your topo map, and locate distinctive features. Formations at a distance are abstract enough to resemble the map's contours; with practice, you can make that same mental abstraction with nearer geography.
Our topo-literacy is marginally adequate, meaning most of the time it keeps us from getting turned around, whereas other times it helps us get lost. On the way west from Tanner Rapids after departing the Beamer Trail, we rose and fell through a tiringly stupid series of drainages and washes, and were anxious to reach our next planned campsite. Hope somewhat aggrandized my view of the day's progress, and I scrutinized the map for signs that we would shortly descend into Unkar Rapids. In fact, I was so pleased with the amount of trail we had covered that we tramped on, finally scrambling our way into the next available river access only when the sun hung low in the sky.
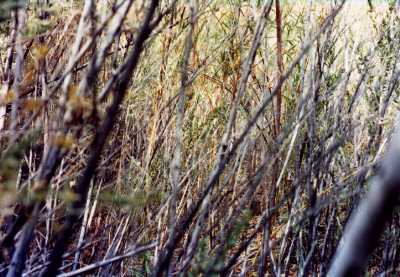 The Tammies
It seemed a bit cramped--only a small patch of sand surrounded by tamarisk--and in the fading light, we couldn't make out the beach beyond. A scouting venture into the tammies met only with scratches, bugbites and cul-de-tams, so dinner was pleasantly prepared and served on a rock ledge behind the tent. The next day, we found ourselves still considerably east of Unkar. My mistake was to force the map and the topology to fit my wishes, and to believe in that fit, like the puzzle piece that's the right color and almost squashes into place. Our eventual exit from Unkar was also marred by this Jungian topo-projection, and I in particular have still not quite learned to subdue the desires of my animus to the landscape's reality.
Fortunately, we have not yet been forced to use our compass, but we turn to it out of curiosity, to confirm our location, and for practice. Unlike a Kodak, it's not a point-and-shoot item; a Silva compass, for example, has the usual magnetic needle, a movable "North" marker, and a direction-of-travel baseplate. This combination makes it possible to weave in and around objects and hike over hills and valleys, while still maintaining a fix on your destination.
To set the compass, put it on your topo map, using the baseplate's direction-of-travel marker to form a line from where you now stand to your destination. Next, twist the settable "North" marker until it's lined up with the map's magnetic north. The compass is now set. (It's good to draw a pencil line on the map for later reference.)
To find your way, hold the compass with its direction-of-travel arrow pointing away from your body. Turn yourself around until the north (red) end of the needle lines up with the settable "North" marker. You are now facing your destination--your direction-of-travel marker points that way, along with your body. Here's the important part. Find a reasonable landmark precisely along that line of sight, and head for it. When you get there, once again hold the compass, align it (and you) until the two norths match, find another landmark, and go. Always reach the first landmark before looking for a new one!
If your destination is far and your landmarks were closely spaced, you will occasionally have to check (and perhaps adjust) your settings. Find your present location on the topo map; be sure. You should be standing somewhere on the original start-destination line you made, or at least very close. If not, you have either read your map incorrectly (we like to do that, as you know), or the errors introduced by frequent landmarks have compounded. Don't make any changes, though, unless you are absolutely certain about your location.
Using the compass is kind of like a formula; once you've got the concept, you need only identify which variables go with which values. Suppose you're lost (ah!), so you can't draw any map lines. If you are on a trail, stay on it and keep checking your compass for the direction you are heading, and your topo map for landmarks you can identify. If you're off the trail (why are you off the trail?), study the topo map for your approximate location. Better yet, site two landmarks if you can, use the compass arrow to determine their bearing with respect to north, and mark these on the map. They intersect at you. Then set a course from "here" to the nearest intersection you can make with the trail.
The compass business isn't actually complicated, it's just very hard to describe. You need one in your hand, with a map, to get the feel of it. And most good compasses are sold with a variety of instructions and techniques.
In heavily traveled areas such as The Corridor, the trail is absolutely clear. It's well-used, clearly marked, and--on the Bright Angel Trail--often covered in equine deposits. Trails west of Hermit and east of Kaibab are less frequented, and as you get further from the tourist venues, they can vanish almost completely.
 Oh, Lost!
Finding trails and routes is another matter of practice. Obscure areas, unexpected switchbacks, hill climbs, rockfalls, cliffs, and side canyon and drainage entrances and exits are marked by two kinds of rock-piles: cairns (a balanced group of three or more rocks) or ducks (a small one on a bigger one), depending on the significance of the marking. The terrain is filled with heaps of rocks, but cairns and ducks are balanced in an unnatural way. There's no system; they just mean look.
An unnaturally even row of rocks across your path is a symbolic barrier that means, "this ain't it--look left or right." You will often find these barriers where the trail has been changed or missed enough times to create a short trail of confusion.
Trails regularly cross drainages, washes, and runoffs of all sizes. Hikers make an effort to keep these marked with cairns and not to cut across undisturbed ground, but occasionally --especially in rocky areas or hard plateaus--there is little visible difference between a minor runoff and a faint trail. Observation remains your best tool: Check for cairns; look ahead to see where the fading trail picks up again, and scan it back to you; assay the difference between soil packed by feet and soil eroded by rainwater; learn to feel what is natural and what is alien.
A rule: Don't add or remove cairns. Once you gain lots of experience, you might put a duck where a recently weathered trail has gotten you hopelessly lost. But, really, don't.
There is something else in the Canyon that can get you very lost: burro trails. We have been snagged several times by these; one took us over eight miles out of the way. It was going where we wanted to go, but it was the wrong trail, and ended on a cliff that only burros could love. Observation, not hope, should have guided us, as there had not been a discernible human footprint for several miles.
Here comes the disclaimer. No matter what you read anywhere, including here, always get current water availability information from the BRO. That said, I can recommend that you do several hikes where water is plentiful (a relative term, naturally) before going into drier areas. Here again it's a matter of feel. Every book will recommend water at so-much-an-hour or so-much-a-mile or so-much-a-particular-hike. But the weather changes, trails change and people are different. Do I sound redundant? Nothing substitutes for experience, and even the experienced die.
If you cross water, take the time: Draw some more, purify it, fill your bottles, and then continue. On our way out from the river, we didn't take the time to fill all our bottles at Horseshoe Mesa, and the afternoon grew warmer than we expected. It was our first journey on the Grandview Trail, it was long (a time-consuming, twisty loop of trail was actually off the edge of our map), we were fooled by the fool's corner, and we arrived at the top with only a few sips left. We were never in real danger, but we learned the lesson. Take water. Drink it. Don't be stylish; let the bottles dangle everywhere. All hikers look like geeks, even the ones with bronze faces, wirey bodies, and Volkswagen-sized packs.
The Middle-Aged Hiker is Copyright ©1993-97,2002 by Dennis Báthory-Kitsz and David Gunn. All rights reserved.
![]() Please offer your comments.
Please offer your comments.
![]() Web pages by Malted/Media.
Web pages by Malted/Media.